
How to Add a Chat to a Project in Claude
Learn how to add a chat to a project in Claude.ai, either by starting a new chat inside a project or by moving an existing one from your sidebar.
Claude.ai lets you organize conversations into Projects. A Project is a dedicated workspace that groups related chats and gives them shared files and instructions. You can create new chats inside a Project or move existing chats into one. If you have not set up a project yet, see how to create and manage a project in Claude for instructions, files, and archiving.
But when you create a project, your existing chats do not move there automatically. They remain in the main sidebar. And if you accidentally start a new chat outside the project, that conversation will not have access to the project's shared files, instructions, or context.
Adding a chat to a project does not merge conversations together. Each chat remains separate inside the same project.
In this guide, you'll learn how to add chats to a project in Claude using both new-chat and existing-chat methods.
Projects are useful when:
- You are working on an ongoing task such as writing, research, or coding
- You want Claude to follow the same instructions, tone, or workflow across multiple chats
- You regularly use the same files or reference documents in different conversations
Prerequisites
-
A Claude.ai account. Free plans support up to five projects, while paid plans do not have a project limit. You can check your current plan and limits from Settings, or compare plans on Anthropic's support site.
-
At least one project already created in Claude.ai. If you don't have one yet, here's how to create one quickly:
- Click Projects in the left sidebar.
- Click New project.
- Give it a name and optionally add a description or custom instructions.
- Click Create project.
Your new project is ready. You can start adding chats to it right away.
For Anthropic's official reference, see how can i create and manage projects
Starting a New Chat Inside a Project
You can start a chat directly inside a project. The new chat uses your project's uploaded files and instructions right away, so you don't need to re-upload files or repeat context. If you're attaching files directly in a chat instead, see Upload Files to Claude.
Use this method when you're beginning a fresh task and want it to use your project's files and instructions from the first message.
- Open Claude.ai and click Projects in the left sidebar.
- Select the project to open it.
- Type your message directly into the chat input to create a new chat and press Enter.
The chat is now part of the project. You'll see the project name at the top of the page. That confirms the chat belongs to the project and can use every file and instruction you've added.
Note: You can create a new project directly from the Move chat window while moving a chat, without leaving the conversation.
Moving an Existing Chat into a Project
You can move any chat to a project, and the full chat history moves with it, nothing is lost.
Use this method when you've already started working in a chat and want to add it to a project without starting over.
Note: You can move your own chats between projects. If you use the Team plan, you cannot move chats created by other teammates. For a full breakdown of what each plan allows, see Choose a Claude plan.
Moving a Single Chat
You can use this method when you need to move a single chat into a project.
-
Open the chat you want to move.
-
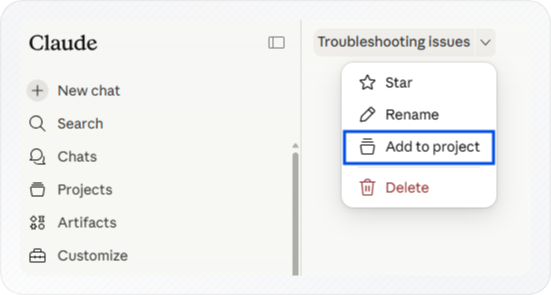
Click the dropdown arrow next to the chat title.
-
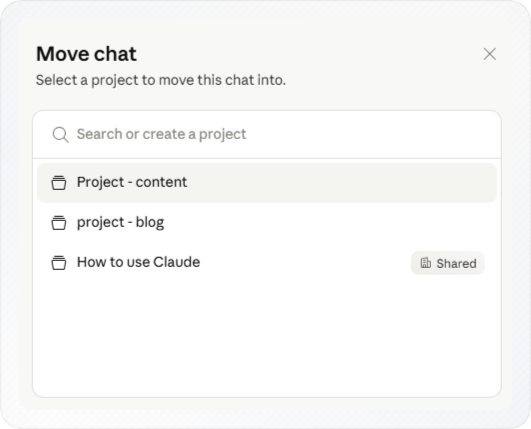
Select Add to project. The Move chat dialog opens.
-
Select an existing project from the list or type a new project name to create one. (for example, "content-blog").
-
Click the project name in the search results.
To confirm the move, look at the chat title. It now shows both the project name and the chat title together (for example, content-blog / My chat).
Note: Each chat can only belong to one project. Moving it to a new project removes it from the previous one, Claude moves the chat immediately without asking for confirmation.
If you have many chats to move at once, use the bulk method below.
Moving Multiple Chats at Once
You can use this method when you have five or more chats to move at once. Instead of opening each chat individually, you can select multiple chats and move them in one action. Bulk moving happens from claude.ai/recents, not from the sidebar.
- Click Chats in the left sidebar (or go to claude.ai/recents directly).
- Click the Select chats button.

- Click each chat you want to move. A checkmark appears on each selected chat.
- Click Move to project. The Move chat dialog opens, showing the number of chats you selected.
- Select an existing project from the list or type a project name to create a new one.
- Click the name in the search results.

All selected chats are added to the project at the same time. Open the project from the sidebar to see the moved chats along with your existing project conversations.
Moving a Chat That's Already in a Project
If you've already moved a chat into a project and later realise it belongs in a different one, you can move it again. Use the same dropdown arrow inside the chat, all chat history moves with it, nothing is lost.
-
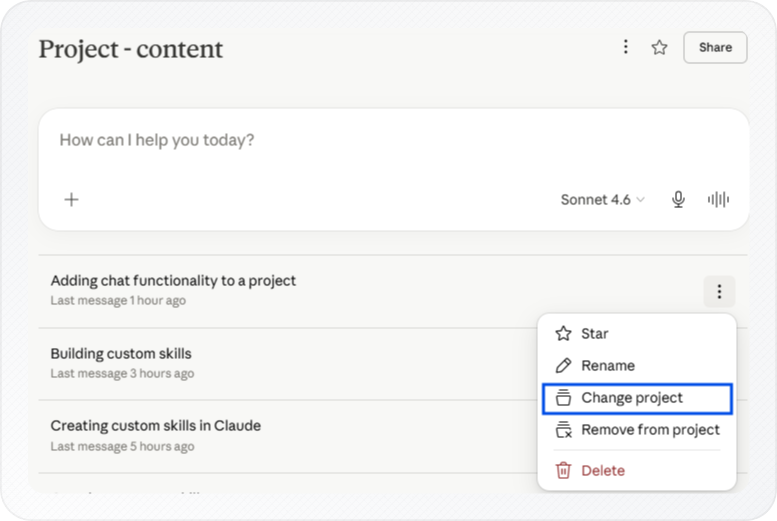
Open the project that contains the chat.
-
Click the three-dot menu next to the chat, then select Change project.
-
Select an existing project from the list, or type a project name to create a new one.
-
Click the project name in the search results.
You can also move a chat directly from inside the chat window. Click the down arrow next to the chat title, then select Change project.
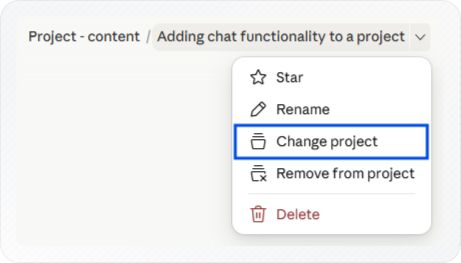
The chat moves to the new project right away.
Knowing What Chats Can Share Inside a Project
Two chats inside the same project do not share conversation history with each other. Each conversation stays separate, even inside the same project.
What all chats in a project do share is the project knowledge base, the files and instructions you upload to the project. If you need something from one chat to be available in another, add it to the project knowledge base. Every chat in the project can then access it. For uploading files to a project, see how to create and manage a project in Claude.
Note that Claude's memory works separately from project knowledge. Memory covers standalone chats only and is not shared inside projects.
Conclusion
You can now organize chats inside a project, start new chats directly within a project, or move existing chats from the sidebar or chat history page. Both methods keep your full chat history and give each chat access to the project's uploaded files and instructions.
Next, add your key reference files to the project knowledge base. Every chat in the project will have access to them from the first message, without you having to repeat context each time.